実際に自動化された開発環境を制作していきましょう。
自動化処理の流れ↓
- distの中身を消す
- 画像、css、html,jsをdistにコピー
- scssをコンパイルする
- プロパティをルール通りに並べる
- プレフィックスを付ける←今ここ
- pugをコンパイルする
- jsを統合、トランスパイルする
- (監視)画像の追加、名前の変更を検知してdistにコピー
- (監視)scssの変化を検視し、自動コンパイルコンパイル
- (監視)cssの変化を検知してプロパティをルール通りに並べる
- (監視)cssの変化を検知してプレフィックスを付ける
- (監視)jsの変化を検知してファイルを統合、トランスパイルする
- (監視)pugの変化を検知し、コンパイルする
- (監視)ファイルの変更を検知してブラウザを更新する
IEに対応するためにコンパイルしたcssにベンダープレフィックスを自動でつけていきます。[user_help]ベンダープレフィックスについてはこちらを参照[/user_help]
プレフィックスを自動でつけよう
プレフィクスを自動でつけるためにはpostcssとpostcss-cliとautoprefixerを使用します。
postcss-cliは前回インストールしていますので今回はpostcssとautoprefixerの2つのインストールになります。
処理は同じsortingで書いたコードで行え、こちらも設定ファイルが必要ですが、設定も同じpostcss.config.jsに追加記載で行えます。
postcssをインストールします。
yarn add postcss
autoprefixerをインストールします。
yarn add autoprefixer
今回はpackage.jsonのscriptsにの処理自体には変化はありませんがsortingという名前が合わないのでautoprefixerに変更しました。
"scripts": {
 "autoprefixer": "postcss -o dist/common/css/app.css src/scss/_app.css"
}
postcss.config.jsに設定を書く
以下のようにpostcss.config.jsに設定を記載します。
module.exports = {
  plugins: [
    require('autoprefixer')({
      browsers: [
        "last 2 versions",
        "not ie < 11",
        "Android >= 4",
        "iOS >= 10"
      ],
      grid: true
    }),
    require('postcss-sorting')({
      "order": [
      "at-rules",
      {
        "type": "at-rule",
        "name": "charset"
      },

---長いので省略---

  ],
  "unspecified-properties-position": "bottom"
}
前回のプロパティの並び替えのルール設定の plugins:[ ]の中に以下のコードを追加しただけです。
require('autoprefixer')({
  browsers: [
    "last 2 versions",
    "not ie < 11",
    "Android >= 4",
    "iOS >= 10"
  ],
  grid: true
}),
browsers:[]の部分で対応させたいブラウザのバージョンを指定することができます。
実行して動作確認
実際に動かして動作確認を行います。
scssは前回のプロパティーの並び替えで使用したapp.scssをそのまま使用します。
.hogeClub {
  color:#ff0000;
  & .hoge {
    height: auto;
    background-color: #000;
    display: flex;
    width: 100%;
    padding: 10px;
    margin-top: 10px;
    & .huga {
      color: #00ff00;
    }
  }
}
以下のコマンドをVS Codeのターミナルに入力して実行しましょう。
yarn wathc
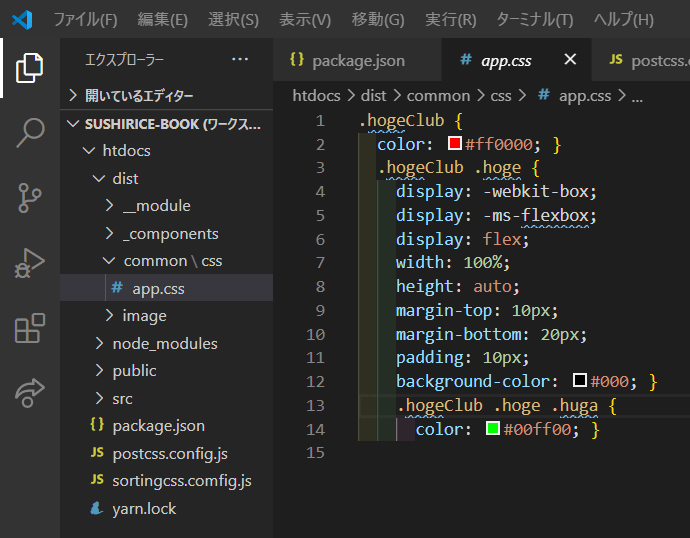
実行したらdist/common/cssの中にあるapp.cssを確認しましょう。

display: -webkit-box;この部分が自動付与したプレフィックスです。
きちんと動作していますね。
まとめ
プレフィクスを自動でつけるためにはpostcssとpostcss-cliとautoprefixerのパッケージが必要です。
postcss-cliは前回インストールしたのでインストール不要です。
postcssをインストールします。
yarn add postcss
autoprefixerをインストールします。
yarn add autoprefixer
package.jsonのscriptsは前回のsorting(autoprefixerに名前を変更しました)がそのまま使用できるので変更する必要はありません。一応記載しておきます(package.jsonのscripts全体)
"scripts": {
    "build": "npm-run-all -s clean copy:mock copy:js css autoprefixer",
    "watch": "npm-run-all -p",
    "clean": "del-cli dist/*",
    "copy:mock": "cpx \"./src/mock/**/*.{html,png,jpg,svg,gif}\" ./dist -v",
    "copy:js": "cpx \"./src/js/{first,vendor}.js\" ./dist/common/js",
    "css": "node-sass --include-path scss src/scss/app.scss src/scss/_app.css --output-style nested --indent-type space",
    "autoprefixer": "postcss -o dist/common/css/app.css src/scss/_app.css",
}
postcss.config.jsのplugins:[ ]の中に設定を追加します。
module.exports = {
  plugins: [
    require('autoprefixer')({
      browsers: [
        "last 2 versions",
        "not ie < 11",
        "Android >= 4",
        "iOS >= 10"
      ],
      grid: true
    }),
    require('postcss-sorting')({
      "order": [
      "at-rules",
      {
        "type": "at-rule",
        "name": "charset"
      },

---長いので省略---

  ],
  "unspecified-properties-position": "bottom"
}

